Designers always look for realistic renders for their project; it is the key to win the approbation of the client because it gives a preview of the final results before the construction. Two of the most famous rendering engines on the market nowadays are Vray and Enscape. So, which one offers better results?
We’ve posted about many rendering comparison before, like Vray and Cycles, Vray and Lumion, Enscape and EyeCad VR, Vray and Corona…,etc. It’s just to say that we received these question many times, and that was a good reason to help 3D artists present their work in the best way possible.
The Vray vs Enscape face-off: a matter of details
When it comes to rendering, the final factor that would determine which one would you choose is the details. In other words, your projects don’t only rely on your modeling and texturing skills (although it’s very important). In such a competitive industry, you would want your work to stand out and catch the eyes of the targeted audience. Note that the result of using these render engines depends on the software you’ll use (Blender, Sketchup, Maya…,etc.). However, it’s not the only thing: our Vray vs Enscape Face-off today will be axed around 7 aspects. But before we dive in, let’s have a brief overview on our two opponents today before we dive in:
- Vray: is a rendering engine that collaborates with Sketch-up to deliver realistic renders. It is also used in the VFX and film making. It is one of the powerful products in the design industry.
- Enscape: offers photo-realistic render using the latest techniques for better results. It was designed in 2013, and since 2015 the software gained a lot of success, used in over 80 countries, and it is on the list of top 100 architectural firms. It collaborates with multiple BIM and CAD software.
1. Modeling and interface
Vray
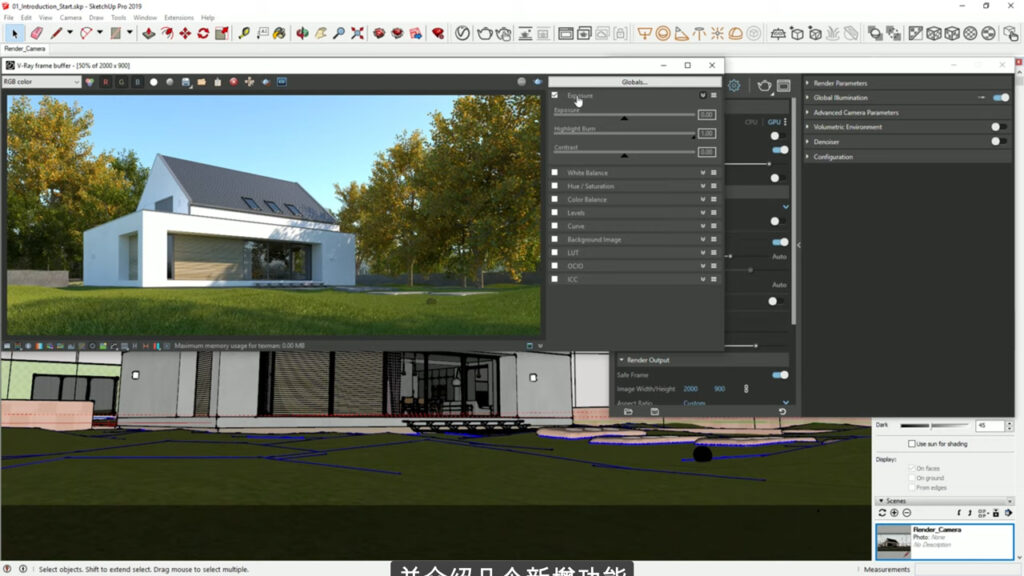
It’s considered as a tool or a plug-in. It collaborates with Sketch-up. All the modeling is made with Sketch-up, Vray is used only for the rendering part. Its interface is simple, and it is integrated with Sketch-up’s interface—it doesn’t contain a lot of tools and options.
The first option that the user needs to manage is the Vray asset editor, with which you can change the materials of any object. Vray contain a large variation of materials for the interior and the exterior and also natural or artificial, by choosing the material the user also can configure it by controlling the color of the material, the opacity, the reflection, the refraction, and adding more texture and other different options. It is also possible to download and export materials in Vray according to the project needs.
In addition, Sketch-up offers different objects for the lighting, such as sunlight, SPOT light, rectangle light, sphere light, IES light, Omni light, and dome light. All these types can be controlled and customized. The user can specify the intensity of the light, the color, and the size as basic parameters.
The engine also has another good option, which is asset creation, allowing the user to have multiple creations options according to its needs in the work. Some of these creations are extra texture for more realistic renders, global illumination to add more light, shadows, self-illumination, background, and others. The software also has a good option for photo treatment after the render to modify exposure, contrast, colors balance, and saturation.

Enscape
On the other hand, Enscape with its great option “Virtual Reality” that helps users reduce time and money for the client. This option gives the possibility to walk inside the project and discover all the aspects and the details of the design. This way, the client can have a real vision of the results before the construction, the changes can be made before finishing the model, and helps to avoid errors at work. In addition, this option makes the user live in an irresistible reality; it works by connecting headphones of virtual reality, like oculus rift S or HTC wive, and a user is ready to discover the project.
It works perfectly in big-scale projects, with the same workflow for small projects and with the same quality and results. The software is also a great coordination tool between different parts of the project; it also contributes to the detection of the collisions, to avoid mistakes early in the project.
Thanks to the real-time option, the user gets to have a visit inside the project to navigate and check all the details from different angles. It is also a good option to see the different modification applied on the model directly.
Another good option in Enscape is the collaborative annotation is when a user publishes any changes relative to the project; all the other parts of the project get the information. A user can also adjust the clouds, density, variety for better ambiance to match the scene; this change will affect the brightness of the render it is also possible to control the time of the day, add some effects manage the depth of the field…etc.
The software has a large variety of objects: vegetation, people, furniture accessories, vehicles to lighting, and buildings. It collaborates with Revit, Sketch-up, ArchiCAD, Rhino and Vectorswork.
2. Settings
Vray
It offers a lot of settings. The user can specify the engine rendering, CPU or GPU. It is also possible to specify the quality from low, medium to high. As for the camera, the user can choose from three types: standard, VR spherical camera, or VR cubemap. The user can also activate or deactivate the exposure and even specify its value, which has a relation with the camera’s sensitivity to the light. It is also possible to use the DoF or the depth of field and effects.
Additionally, it is possible to specify the resolution of the image or choose one of the options that the aspect ratio offers and add a background for external rendering.
It offers also other advanced setting for professional work, like denoiser, global illumination, advanced camera parameters, color mapping…etc.
Enscape
It also offers a lot of settings, starting with buttons and mouse configuration to settings related to rendering style. This option can help users to change the way of rendering in Enscape by changing the outline and the mode, Enscape offers three kinds of modes, white mode with outline 0%, white mode with an outline of 25% or white mode with outline 75%. The user can also choose polystyrol mode and set up the transmission, which controls the quantity of light transmitted through geometry. When using these two modes, it better to use also the dump maps option for better rendering results.
3. Learning curves
- For Vray: learning it is easy. For a beginner, it doesn’t take a lot of time to understand the few options and tools that exist, but for more advanced work and for more realistic renders it is better to have training or to watch tutorials to get to know the different configuration and to have more detailed work.
- For Enscape: is so easy to handle, to work with, and to configure. The tools and the options are simple, so it does not require any training. It is the perfect software for students and beginners in the design industry.
4. Industries that use them
- Vray: is used a lot in the design industry by architects and interior designers; it is also used in the filmmaking industry, media, and entertainment, and also automotive.
- Enscape: is used a lot in the construction field, in the interior design industry, landscape architecture, and furniture design.
5. Rendering and animation

Vray has a great strong rendering engine. The results are so close to reality, especially for the interior design part. Vray pays a lot of importance to the materials, lighting, settings before the renders, and a lot of other configuration related to the render, such us adding texture, reflection and refraction. All these factors play a huge role in the results later. It is also possible to edit the render later in the same window.
There is an option to edit the lighting, the contrast, the balance of the colors, and the saturation—no need to use another software for photo treatment. A simple rendering can take only a few minutes, but if the project is big with a lot of objects with more advanced settings, the render can take some time.

Enscape can render any type of project, interior, and exterior, landscape, hotels, airports, country house… etc. The software also comes with an extensive library full of components; it is also compatible with the components and the textures of the modeling software. The results of the rendering are so realistic. The rendering engine is provided with a pack of setting to control lighting, reflection, time and sun direction for better results.
Although Vray offers an animation option, it is not advanced; it is made only to create small animations or small videos around an object. Enscape, on the other hand, offers the animation and videos option and also panoramic pictures—it is a complete rendering software.
6. Computer requirements
Vray is definitely a powerful engine. For beginners and students, it is possible to use a medium configuration computer for a medium work. But for better and more advanced work, especially for professionals and companies, it is better to use a workstation with a strong processor and two graphic cards and also an advanced ventilation system.
Same case for Enscape! It is better to use a workstation, especially when users work on a big urban project to accelerate the workflow and to have quick results.
We’ve posted a fully detailed article about how to buy a computer as a 3D artist, so feel free to check it out if you still have doubts.
7. Pricing and license
Vray is available for Sketch-up, Rhino, 3DS Max, Revit…, and since these can run on Windows and MAC, automatically Vray does so. For pricing, it is $350 per year. Take a look at the official website for more information.
Enscape’s price is $47 per month, and it is $679 per year with 14 days trial for free to test the software before buying it. The software is available only on windows, no MAC version nor IOS until now. You can check the official website for more information.

